Step 8: Results
Step 8 shows the finished command plan. The step stays locked in the step bar until a calculation has run; afterwards the tool jumps here by itself.
1. Result cards and actions

At the top sits a row of cards comparing actual and target figures: on the left the number that could actually be planned, on the right after the slash the number that should have been planned according to your settings. Cards that would be empty do not appear at all:
- "Nuke" — real nukes from the attack planning.
- "Cleaner" — catapult-cleaners.
- "C-Splits" — C-splits.
- "Fakes (Nuke planning)" — accompanying fakes for the real targets from step 4.
- "Fakes (Fake planning)" — pure fakes from step 5.
- "All" — the sum of all commands, highlighted in dark.
If actual and target match, the plan is complete. If the actual figure is lower, the tab Incomplete targets tells you what exactly is missing.
Next to it are three actions:
- "Save Plan" — opens a window in which you give the plan a name under "Name of the plan". Saved plans are then available under "My Plans & Containers" — and can be published, shared and imported into a new plan from there.
- "Workbench" — copies all commands as workbench strings to the clipboard.
- "Excel" — downloads the complete result as an Excel file.
2. Overview
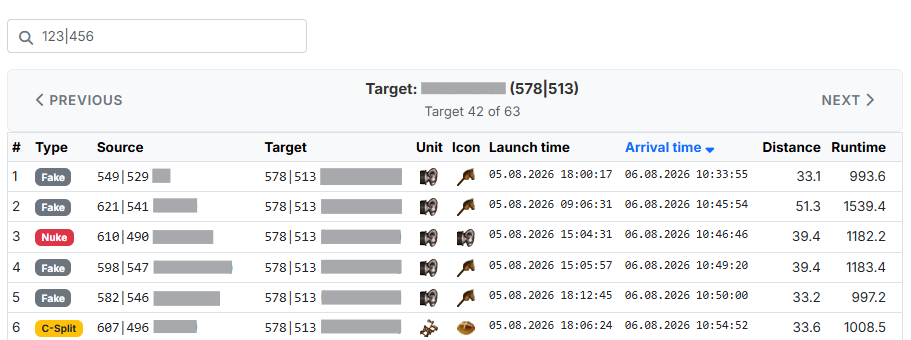
The tab "Overview" shows all planned commands per target. Use
"Previous" / "Next" to page through target by target; in the search
field at the top you jump straight to a particular target by entering its
coordinate (123|456).
The columns:
- "#" — sequential number within the target.
- "Type" — command type as a coloured badge (Nuke, Fake, Cleaner, C-Split …).
- "Source" — origin coordinate and player.
- "Target" — target coordinate and player.
- "Unit" — the slowest unit, which determines the travel time.
- "Icon" — the command icon of the workbench.
- "Launch time" / "Arrival time" — both columns can be sorted by clicking them.
- "Distance" — distance in fields.
- "Runtime" — travel time in minutes.
3. Incomplete targets

This tab lists all targets for which not all required commands could be planned. A red badge on the tab name shows their number. They are sorted by the missing nukes, the most urgent first.
The columns name the coordinate (player), the category and then, per kind of command, how many are missing — Nukes missing, Cleaner missing, C-Splits missing, Fakes missing — as well as Total missing. Where nothing is missing, a "-" is shown.
If all targets are supplied, the green message "All targets are complete." appears instead.
What to do when commands are missing
Missing commands almost always mean that the permitted pool was too narrow. Worthwhile levers: switch on more village categories in the prioritization or switch strict prioritization off, set the distances between the nukes more generously, widen the arrival time frame or shrink the frontline in step 1.
4. Sending players
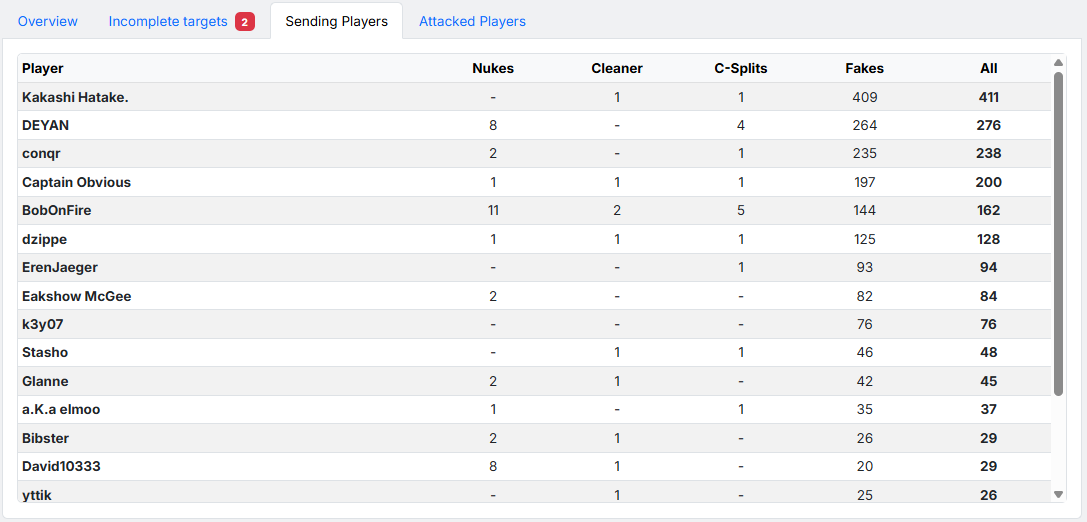
Shows which player sends how many commands — sorted descending by the total number. Columns: Player, Nukes, Cleaner, C-Splits, Fakes and All.
Helpful for spreading the load evenly and for spotting when a single player is overloaded.
5. Attacked players
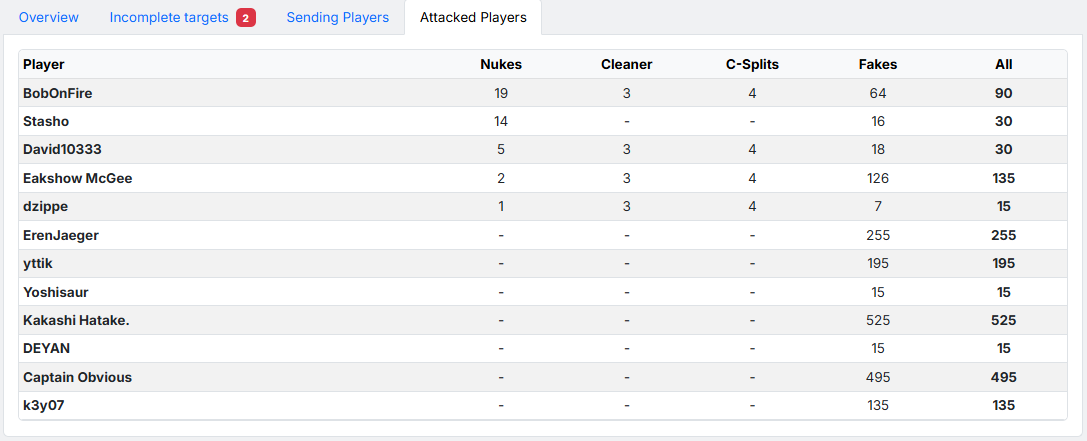
The counterpart: which enemy player receives how many commands — sorted descending by nukes. The columns are the same as in section 4, but here they refer to the attacked player.
6. The plan on the map
After the calculation the overall map draws the plan as command lines from origin to target village, separated by colour according to command type. At every target ring the actual/target figures are shown, and a click on a target opens an info box with all commands on it. See The Overall Map · Command lines.
7. Repeating the calculation
If you are not happy with the result, simply jump back into the step concerned, adjust the settings and press "Calculate" again. Your inputs are preserved.