Planning (Container)
The "Planning" tab is the largest area of the Leader-View. It is split into two sub-tabs:
- Container — collect, coordinate and distribute attack plans to the players. That is what this page is about.
- Tribe Surveys — collect preparatory data from the members (snob entries, launch times, excluded source villages). They are described under Tribe Surveys and are preselected when the tab is opened.
TWU-Planner and TWU-Leader only
The "Planning" tab is visible exclusively to users with the TWU-Planner or TWU-Leader role. Details under Permission.
Container
In the "Container" sub-tab you manage the actual attack plans. A container bundles an operation — e.g. a nuke wave, a snob action or an interim cleaner — with all plans and commands and controls the distribution to the individual players.
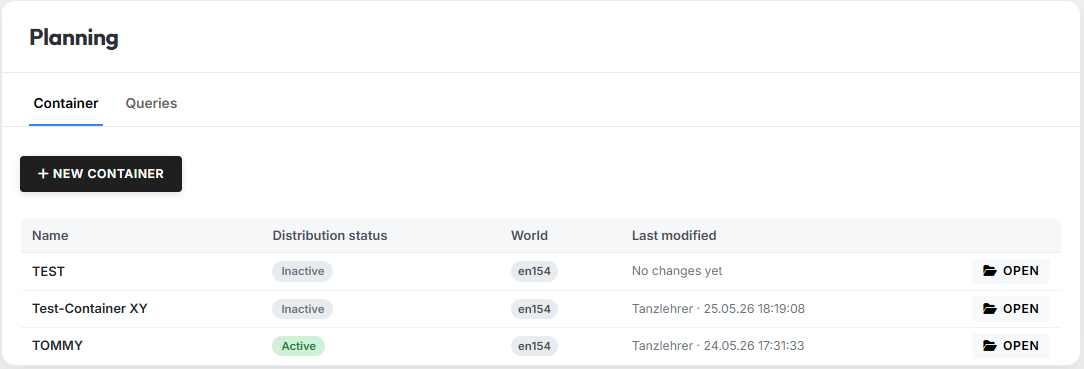
Here you can open existing containers and create new ones. Clicking "Open" switches to the respective container overview.
Create a new container
By clicking the "New Container" button you create a new container.
A modal opens in which you must set a name for the container
(max. 50 characters, e.g. Op. Phoenix).
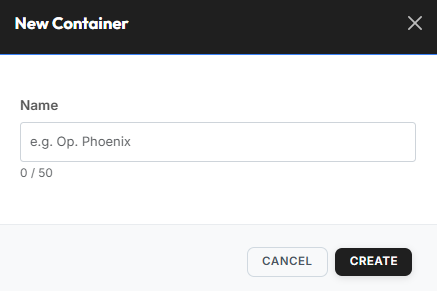
After confirming, the container is automatically assigned to the current world, starts in the status "Inactive" and appears immediately in the container overview.
Structure of a container
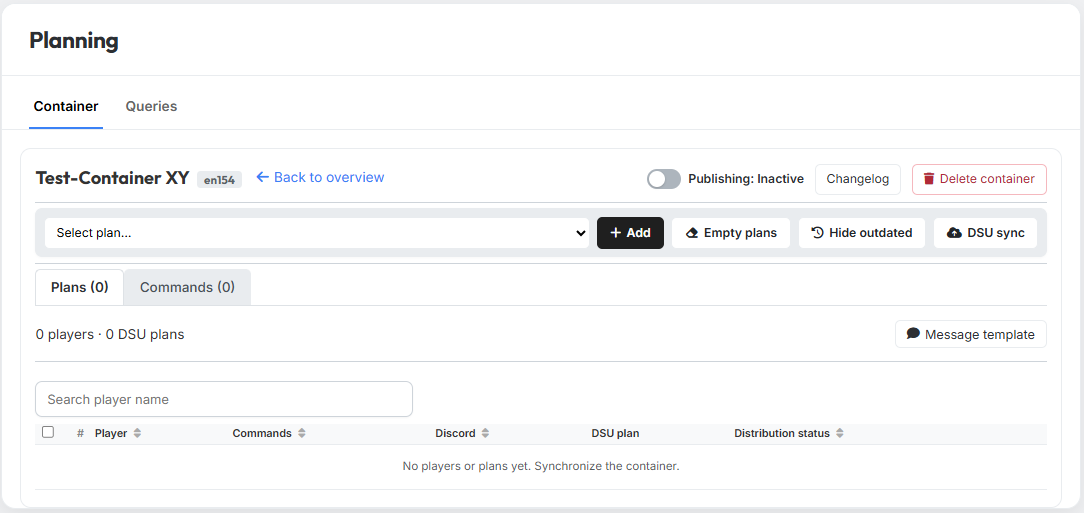
Right after creation, a container is still completely empty — neither plans nor commands are stored yet. The basic frame with header, action bar and the two tabs is however already visible:
Header area
In the header area you find the container name and the world badge of the associated TW world on the left. Via the "Back to overview" link you return to the tribe's container overview.
On the right side you find the container-wide actions:
- the publishing toggle to activate / deactivate the container (see Publishing),
- the "Changelog" button for the change history (see Other),
- the "Delete container" button for completely removing the container (see Other).
Action bar
Directly below the header sits the action bar with the tools to populate and synchronize the container:

Via the "Select plan…" dropdown you choose a plan from your saved plans and add it to the container with a click on "Add". After adding, the "Plans" and "Commands" tabs update accordingly — the imported per-player plans and commands appear there immediately. In the same way you can add further plans one after another.
To empty the container completely, a click on "Empty plans" removes all previously imported commands in one step. The "Hide outdated" button hides, in one go, every command whose launch time already lies in the past — they remain in the container but are simply no longer displayed. You bring them back via the "Show hidden" checkbox in the "Commands" tab (see The "Commands" tab).
DSU plans persist after \"Empty plans\"
If the container has previously been transferred to DS-Ultimate via "DSU sync", the DSU plans created there (one per player + total plan) also remain after "Empty plans". The commands within those DSU plans are however also removed by "Empty plans" — only the empty DSU plan stays behind.
A click on "DSU sync" transfers the commands currently in the container to DS-Ultimate. The tool creates a separate DSU plan per player as well as a "total plan" with all commands. Details on this step can be found in the DSU sync section.
"Plans" and "Commands" tabs
In the lower area of the container the two tabs "Plans" and "Commands" are available. Details for both tabs are in the respective sections below.
"Plans" tab
In the "Plans" tab you manage the players' attack plans — there is one row per player for whom commands exist in the container.
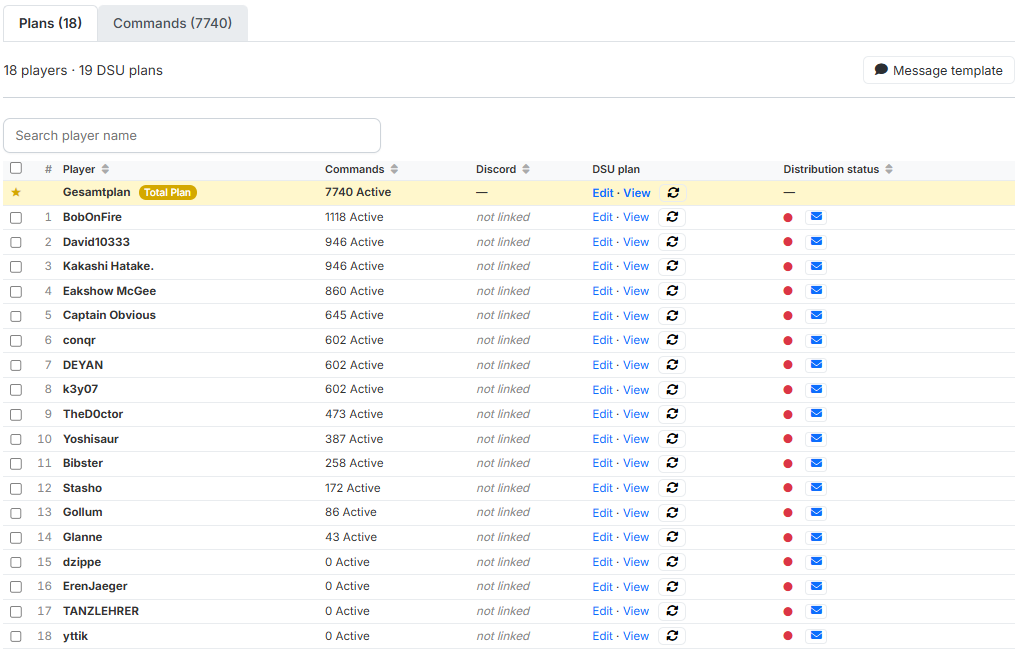
At a glance you can tell whether the player account is linked to a Discord account; that immediately shows you whether the player can download the plan themselves via the tw-utils Discord bot or whether you need to send it to them via in-game message. You also see the DSU plan link of the respective player — this only appears after a DSU sync has been performed. The distribution status finally turns green as soon as the plan has been sent via in-game message or as soon as a linked Discord user has downloaded the plan via the Discord bot.
In addition, several functions are available to you as tribe leadership, described in the following sub-sections.
Functions
DSU sync
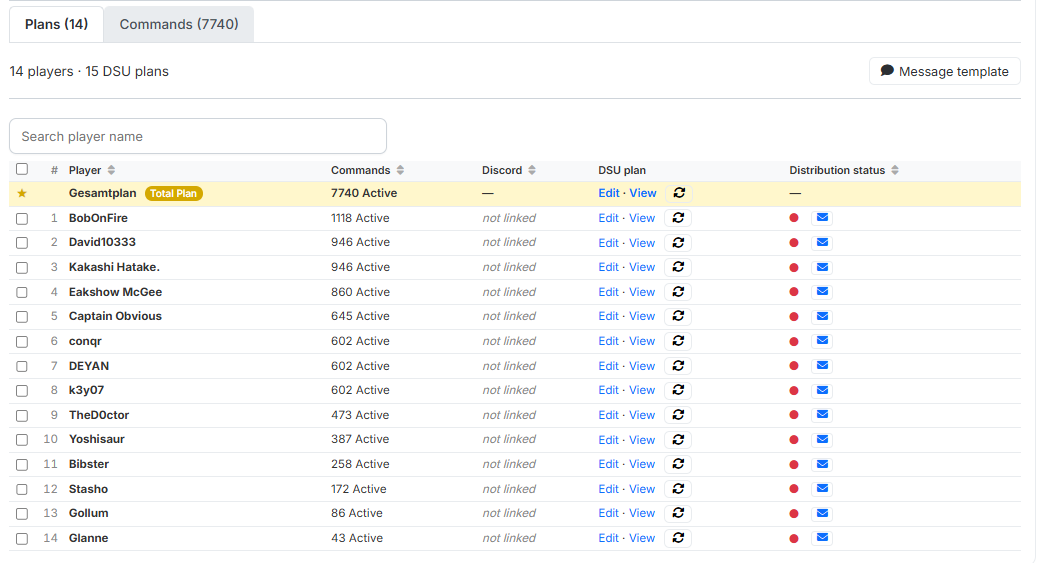
After clicking "DSU sync", the tool creates a DSU plan on DS-Ultimate for each player; in the "DSU plan" column the links "Edit · View" appear.
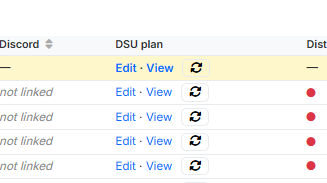
In addition, the highlighted row Gesamtplan appears at the very
top, carrying the yellow "Total Plan" badge — it contains all
commands of all players in a single DSU plan.

Below the plan bar the hint "Pending changes: +X / −Y / ±Z" shows how many commands have been added (+), removed (−) or changed (±) since the last sync. As long as it is visible, the DSU plans are not up to date — with nothing pending, the hint disappears entirely.
What gets synchronized?
Only commands that are present in the container and not hidden are transferred to the DSU plans. Hidden commands (via "Hide outdated" or manually) remain in the container but do not flow into the DSU sync.
Plan distribution
The finished plans can be distributed to the players in three ways:
- Via the Discord bot — players with completed account verification can download the plan themselves via the tribe's Discord server.
- Via in-game message — the leader sends the plan individually via in-game message, optionally with the message template provided by tw-utils.
- Other distribution via export — the DSU links can be exported as a TXT file and reused outside the game (e.g. forum posting, Discord DM, etc.).
Distribution via the Discord bot
Players who have completed their account verification with their TW account can download the attack plan themselves via the Planning-System of the tw-utils Discord bot. Active sending by the leader is not necessary here. Which players are verified via the bot can be seen in the Discord column of the overview.
Distribution via in-game message
If players are to receive the plan via in-game message, the message template comes into play — the text template that is individually filled in for each player when sending.
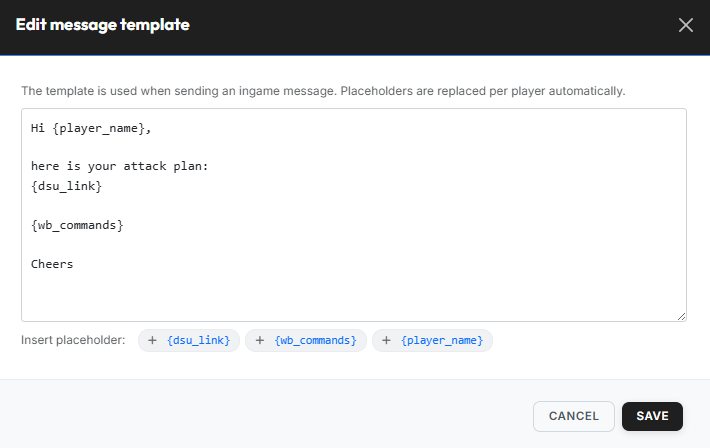
Via the "Message template" button you open the editor "Edit message template". The placeholders are replaced per player automatically:
| Placeholder | Is replaced with |
|---|---|
{player_name} |
Name of the player the message goes to |
{dsu_link} |
Individual link to the DS-Ultimate plan of this player |
{wb_commands} |
All WB commands of the player in a spoiler block. |
Once the message template has been created and saved, you can start the distribution by clicking the blue letter icon in the "Distribution status" column:
The "Send in-game message" dialog opens, showing the finished message for the respective recipient (template with resolved placeholders, including WB-commands spoiler).
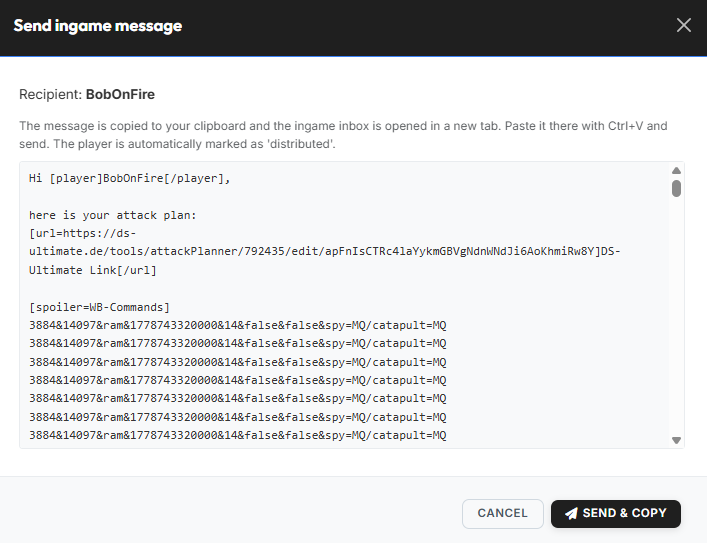
Via "Send & copy" the message is copied to the clipboard and at
the same time the in-game message is opened in a new tab — there
simply paste with Ctrl+V and send. The player is automatically
marked as "distributed".
Other distribution via export of DSU links
If the distribution is to take place outside of Discord and in-game — e.g. centrally in the tribe forum — you can download the DSU links of the selected players as a TXT file via the bulk action "Export Links".

To do so, mark the desired players in the player table; in the action bar that appears at the top, you then choose "Export Links". The TXT file contains one DSU link per marked player and can be reused freely.
Status & link management (bulk actions)
To allow a single player to receive the plan again, or to manage multiple players at once, there are two tools: the reset icon in each individual row and the action bar with bulk actions above the column selector.
Reset distribution status individually
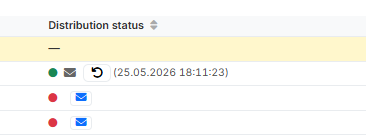
The distribution status in each row jumps to green after sending and shows the timestamp of the distribution. Via the small reset icon (arrow in circle) the status can be manually reset — e.g. if a player should receive the plan again.
Bulk actions for multiple players
As soon as you check at least one entry in the player table, an action bar appears at the top with bulk actions. Via "Reset distribution status" you reset the distribution status of all selected players to 🔴 — useful when the plans should be distributed again. With "Renew plan links" a new DSU link is generated for the selected players; the old link becomes invalid immediately, so the affected players have to actively fetch the new link. The bulk action "Export Links" is described in the Plan distribution section. Via "Cancel" you discard the current selection.
"Commands" tab
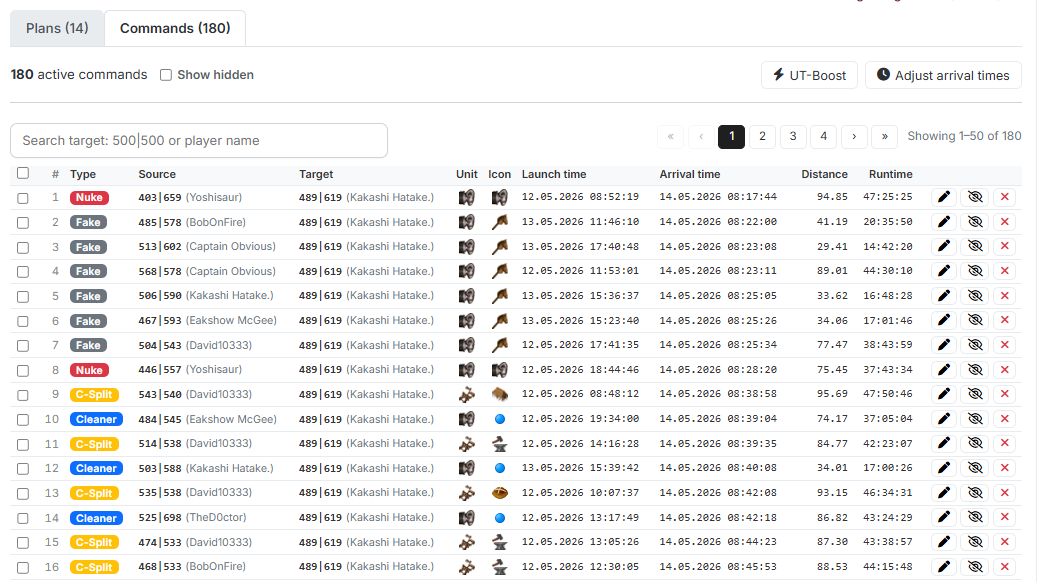
In the "Commands" tab you, as a leader, manage the commands contained in the container. Individual commands can be edited, hidden or deleted here — hidden commands can be brought back into view at any time via the "Show hidden" checkbox. Bulk actions such as adjusting arrival times and applying UT boosts to fake-UT commands are also possible here. The individual functions are described in the following.
Functions
Edit a single command
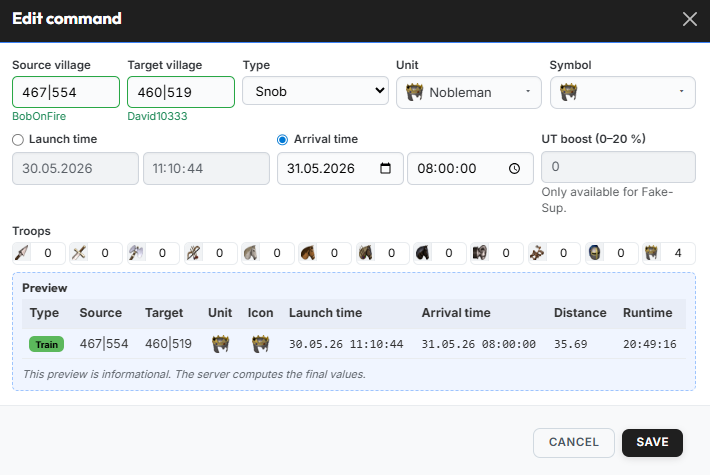
Via the edit icon of a command you open the "Edit command" dialog. Here you can adjust a single command afterwards.
In the upper area of the dialog, Source village and Target village with their coordinates are available for editing; the player name is automatically shown below the respective field. Via the "Type" field (e.g. "Snob", "Nuke" or "Fake"), "Unit" (fastest unit used, it determines the runtime) and "Symbol" (DS-Ultimate icon of the command), you set the key data of the command. For the times, one of the two values Launch time and Arrival time is editable — the other is calculated automatically. The UT boost (0–20 %) is optional and only relevant for fake-UT commands. Under "Troops" you enter the number of troops per unit type in the command.
The Preview at the bottom of the dialog provides a live preview of the command. It is purely informational — the final values are calculated by the server on save.
Adjust arrival times
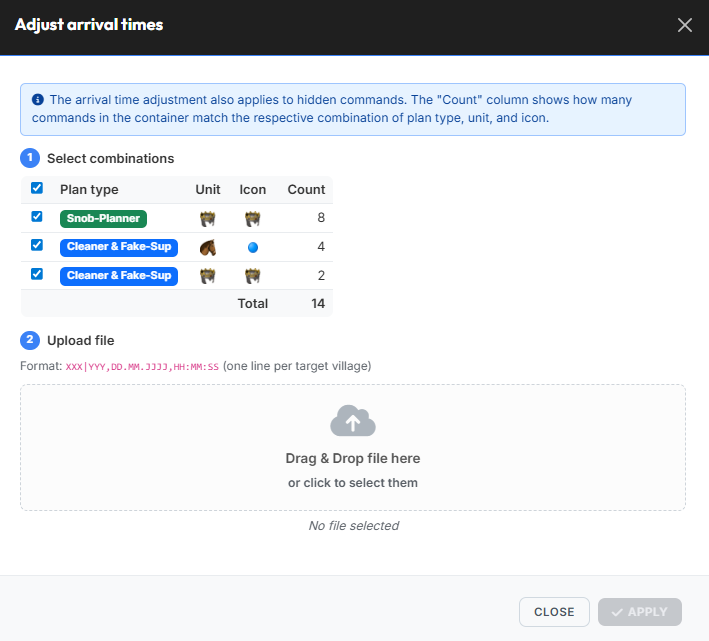
The "Adjust arrival times" dialog shifts the arrival times for certain command groups. This function is often used to align snob commands to the latest running nuke, for example.
In the first step, you selectively choose which plan-type / unit / icon combinations should be adjusted — so you can limit the adjustment to individual command groups and leave others untouched. The "Count" column shows, per row, how many commands in the container fall under the respective combination; the "Total" column sums the currently marked selection.
In the second step you upload a text file with the new arrival times
— one line per target village in the format
XXX|YYY,DD.MM.YYYY,HH:MM:SS. The file can be placed via drag & drop
or selected by clicking.
Adjustment includes hidden commands
The adjustment of arrival times also applies to currently hidden commands of the selected combination.
Apply UT boost
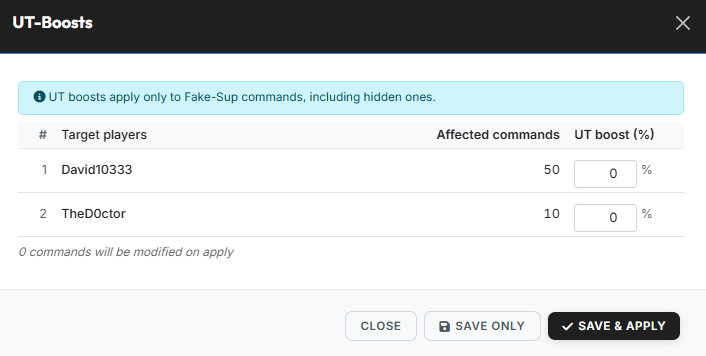
Enemy players often activate the UT boost during an offensive action. Support commands like fake-UTs then have a shorter runtime. The originally created attack commands do not account for this, because at planning time it is not clear whether an enemy player will activate the UT boost.
Once a player has activated the UT boost, you can use the "UT boosts" dialog to retroactively adjust all fake-UT commands targeting that player to the activated boost. To do so, enter the corresponding boost percentage (0–20 %) per target player in the table.
Only for fake-UT commands
UT boosts apply exclusively to fake-UT commands and include hidden commands as well.
- "Save only" — stores the entered boost values without recalculating the affected fake-UT commands yet. The actual adjustment of the commands only happens on a later click on "Save & apply".
- "Save & apply" — save the values and immediately apply them to all affected commands.
Publishing
Via the publishing toggle at the top right of the header area the leader controls whether the container is actively delivered to the outside.
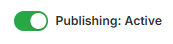
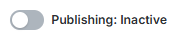
If the toggle is set to "Active", the players can download their plans themselves via the Discord bot (Planning-System) and see the corresponding commands on their "My Commands" page at tw-utils.net. If the toggle is set to "Inactive", both pause: neither the Discord download nor the display under "My Commands" is then available. In this state the container is only visible internally in the Leader-View — ideal during the preparation of an operation.
No effect on already distributed DSU plans
The publishing toggle only affects the Discord download and the display under "My Commands". Plans already synchronized to DS-Ultimate remain there and are still accessible, even if the container is switched to "Inactive".
Other
Changelog
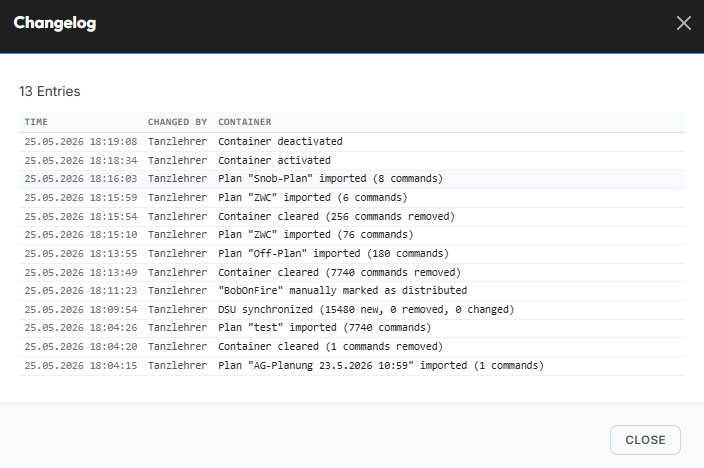
Via the "Changelog" button you open the full history of all changes to the container. Per entry you see the timestamp, changed by (leader or player) and, in the Container column, the executed action.
Delete container
Via the "Delete container" button in the header area (right next to "Changelog") the entire container including all imported plans and commands is removed. The action is irreversible — deleted containers cannot be restored. Before deletion a confirmation dialog appears to prevent accidental deletions.
Already distributed DSU plans remain intact
The plans created on DS-Ultimate remain in place after the container is deleted — once created, a DSU plan can no longer be removed through the interface. tw-utils does, however, automatically empty the associated DSU plans when the container is deleted, removing all commands there.
Links you already handed out therefore keep working, but show an empty plan afterwards. To get rid of the plan for good you have to delete it on DS-Ultimate directly.