The Overall Map
The map is reachable from every step: via the "Map" tab on the left edge of the content area. It shows the world with your noble villages, the targets and the planned commands — and in manual mode you plan directly on it.
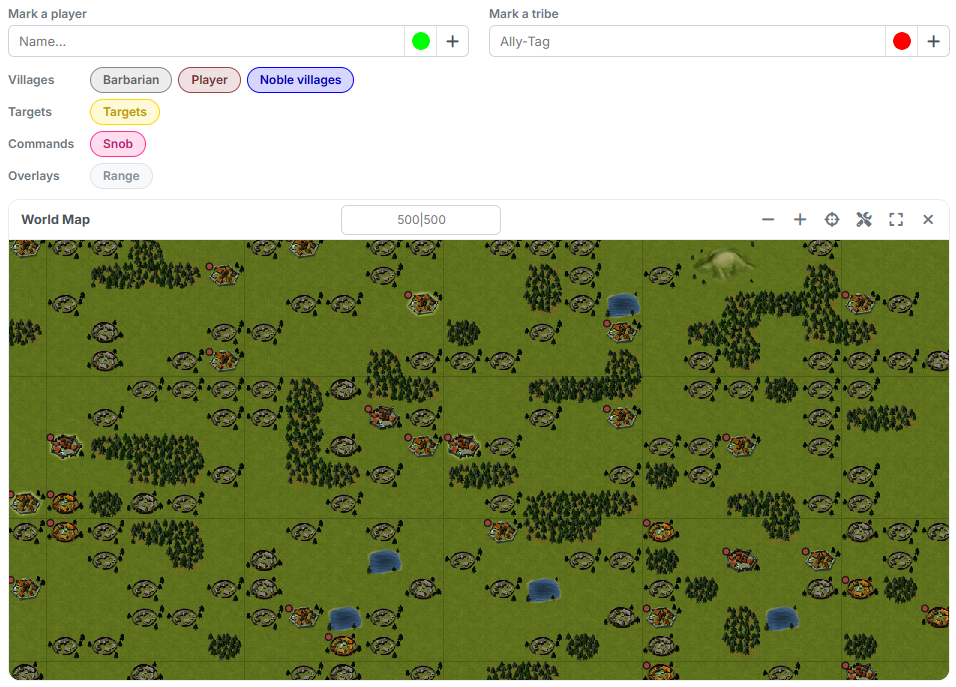
1. Control panel and layers
Above the map sits the control panel:
- "Mark a player" and "Mark a tribe" — enter a name or tribe tag, pick a colour, add it with the plus button. The marks collect below and can be removed individually.
- The layer chips switch what is visible:
| Row | Chips |
|---|---|
| Villages | Barbarian, Player, Noble villages |
| Targets | Targets |
| Commands | Snob — only appears once commands are planned |
| Overlays | Range — starts switched off |
In the map card itself you jump to a spot via the coordinate field (500|500)
and operate the zoom, "Show all", the selection, the show/hide of the
control panel and the fullscreen mode.
2. What the map shows
Your noble villages carry a number stating how many noblemen are still free
there — for instance 4/4 for an untouched village, or 8/12 when four are
already planned. On top of that the map tints them in three shades: untouched,
partly planned and empty. That way exhausted villages stand out immediately.
Hovering over a village brings up the info box with coordinate, player, tribe and points. For one of your own noble villages there is an additional line "Noble village: x / y free", for a target village the line "Target".
3. Selecting targets
Via the button "Select villages on the map" — or directly via "Open map" in step 2 — the map switches into selection mode. A short click picks up a village, a second one drops it again; with the mouse button held down you drag a lasso around a whole area. Panning works with the right mouse button in this mode.
At the bottom the bar counts the selection. "Apply selection" enters the villages as targets, "Clear" discards them.
4. Planning with two clicks
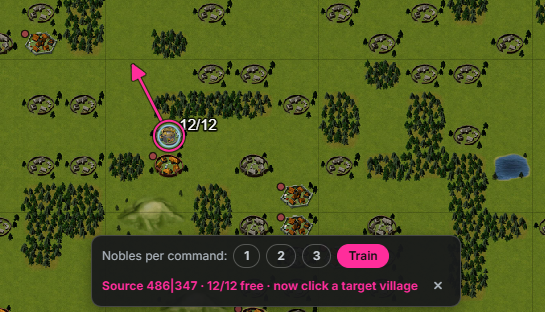
This is the heart of manual mode — and it needs no mode of its own:
- Click the origin village. It gets a ring, and the planner bar appears at the bottom: "Source 486|347 · 12/12 free · now click a target village".
- Pick the step. Under "Nobles per command:" you find
1,2,3andTrain(= 4). The step determines how many noblemen the next command carries. - Click the target village. The command is created and drawn as a line immediately.
You cancel with Escape, via the × in the bar, or with another click on the same origin village.
Unknown targets appear by themselves
If you click a village that is not in the target list yet, the tool creates it as a target automatically — you do not have to record it beforehand.
Not every click leads to a command. The tool declines when the target is out of range, when no noblemen are free in the origin village, when the launch time would fall into a blocked period, when no arrival time has been set — or when you click a barbarian village or one of your own noble villages as the target. It names the reason right in the info box.
5. Commands on the map
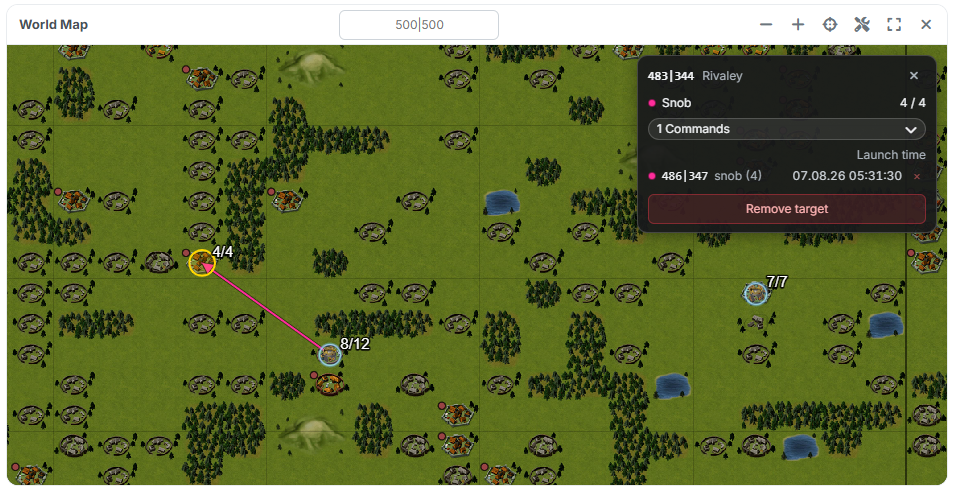
Planned commands appear as lines from the origin to the target village; the chip "Snob" hides and shows them again.
A click on a target village opens its info box. It shows how many noblemen the target has already received ("Snob 4 / 4") and lists under "Commands" every single command with source, count and launch time. The × on a row removes a single command, "Remove target" removes the whole target along with its commands.
Deleting the last command takes the target with it
If you remove the last command of a target on the map that only came into being while planning, the target disappears as well.
Back to the overview: The Two Ways.