Tab 2: Nuke-Planning
In Tab 2 you plan all real attack targets — targets that should be hit with actual nukes. There are three categories: Snob-Spam, Catapult-Spam and Breaking Bunkers. Accompanying fakes for these real targets are also defined here. Planning of pure fake targets (targets that only receive fakes) is done separately in Tab 3: Fake-Planning.
1. Arrival time corridor
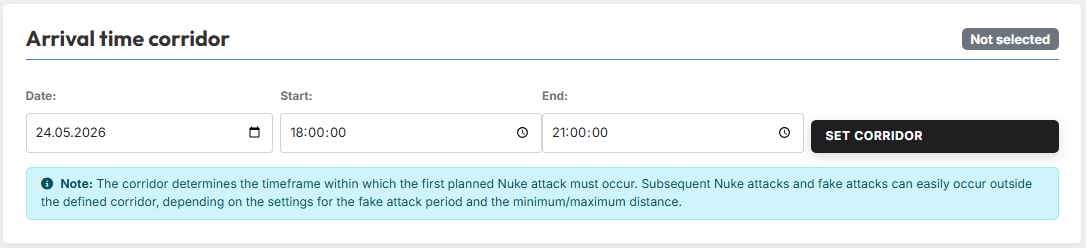
In the "Arrival time corridor" section you define the timeframe in which the attacks should arrive. Enter Date, Start time and End time and then click "Set Corridor" to activate the corridor.
Corridor applies only to the 1st nuke
The corridor defines the timeframe in which the 1st planned nuke must arrive. Subsequent nukes and fakes can easily arrive outside the defined corridor — depending on the settings for the fake time period and the minimum/maximum distance. It is therefore recommended to leave a sufficient buffer to the night bonus when defining the corridor.
2. Global Settings
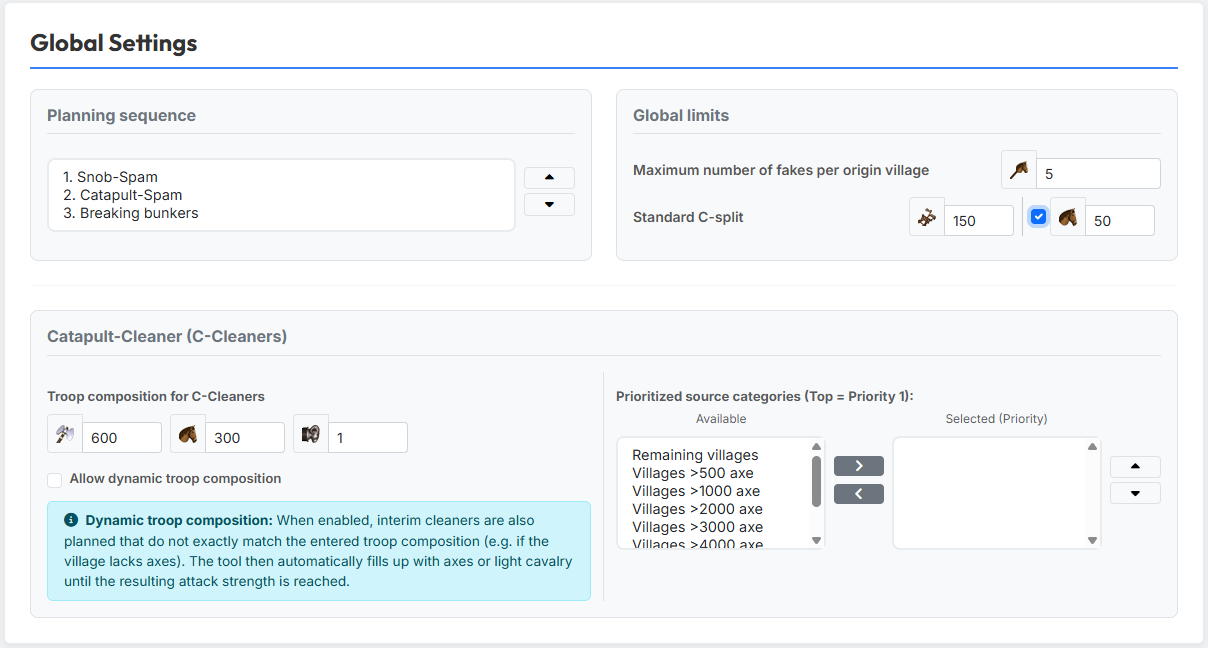
In the "Global Settings" section you configure settings that apply across all three categories.
2.1 Planning sequence
In the "Planning sequence" area you sort the three categories (Snob-Spam, Catapult-Spam, Breaking Bunkers) into the desired order using the arrow buttons. The sequence determines the order in which the categories are planned.
Sequence matters when resources are tight
When nuke resources are tight, the categories at the top of the planning sequence are served first. The category at the bottom will most likely not receive all the nukes it requires. Place your most important category at the top.
2.2 Global limits
In the "Global limits" area you define overarching limits:
- Maximum number of fakes per origin village — how many fakes in total may be planned from a single village.
- Standard C-split — the standard unit count of a single catapult-split.
- Send light cav with C-split — enable the checkbox to plan a
light cavalry escort with every catapult split, and enter the
desired number of light cavalry units per split in the field next
to it (default and minimum:
50).
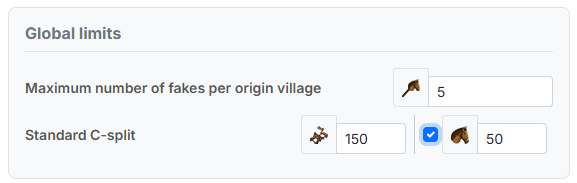
Light cavalry as escort: on/off and minimum amount
If the checkbox is left unchecked, the catapult splits are planned with catapults only (no light cavalry), as before. When you enable it, every split additionally receives the configured number of light cavalry units as an escort.
A minimum of 50 light cavalry units per split applies: a split receives either at least 50 units or none at all — never just an ineffective handful. If an origin village has fewer than 50 light cavalry units left, the split runs without a light-cavalry escort (it is not cancelled, only sent without light cavalry).
If a village's available amount lies between 50 and the number entered in the field, as many light cavalry units are planned as the village can spare — fewer than the desired amount, but at least the minimum of 50.
Fake limit & buffer
The minimum troops a fake must contain are not derived from these limits but from the fake limit of the selected world (e.g. 1 % or 2 % of the village points). The tool sizes the fake troops accordingly and additionally plans a buffer of 500 village points: this way the fake still contains enough troops even if the origin village grows by up to 500 points between planning and sending, which would otherwise raise the required fake limit. Origin villages that cannot cover this buffer from their available troops are skipped for fakes.
2.3 Catapult-Cleaner (C-Cleaners)
In the "Catapult-Cleaner (C-Cleaners)" area you define the default troop composition for interim cleaners: axes, light cavalry and rams.
Dynamic troop composition
When the "Allow dynamic troop composition" option is enabled, interim cleaners are also planned that do not exactly match the entered troop composition (e.g. when the village lacks axes). The tool then automatically fills up with axes or light cavalry until the resulting attack strength is reached. This makes it possible to use villages as cleaners that do not perfectly match the target composition.
To the right, in the "Prioritized source categories" area, you define from which village categories (e.g. Villages >500 axe, >1000 axe, >2000 axe, …, Remaining villages) the C-Cleaners should preferably be launched. Move the desired categories into the right list using the arrow buttons and sort them by priority.
3. The three standard categories
The tool knows three categories of real targets:
- Snob-Spam
- Catapult-Spam
- Breaking Bunkers
Each category gets its own column where you configure targets and command structure independently.
Category names are only a suggestion
The Snob-Spam and Catapult-Spam categories are structurally identical in terms of their settings — only the Breaking Bunkers category offers a slightly reduced set of options. You therefore don't have to take the names literally: you could, for example, use both columns to plan two different catapult actions in parallel. The labels merely reflect a typical use case, but are not mandatory.
4. Target selection & Command planning – Overview
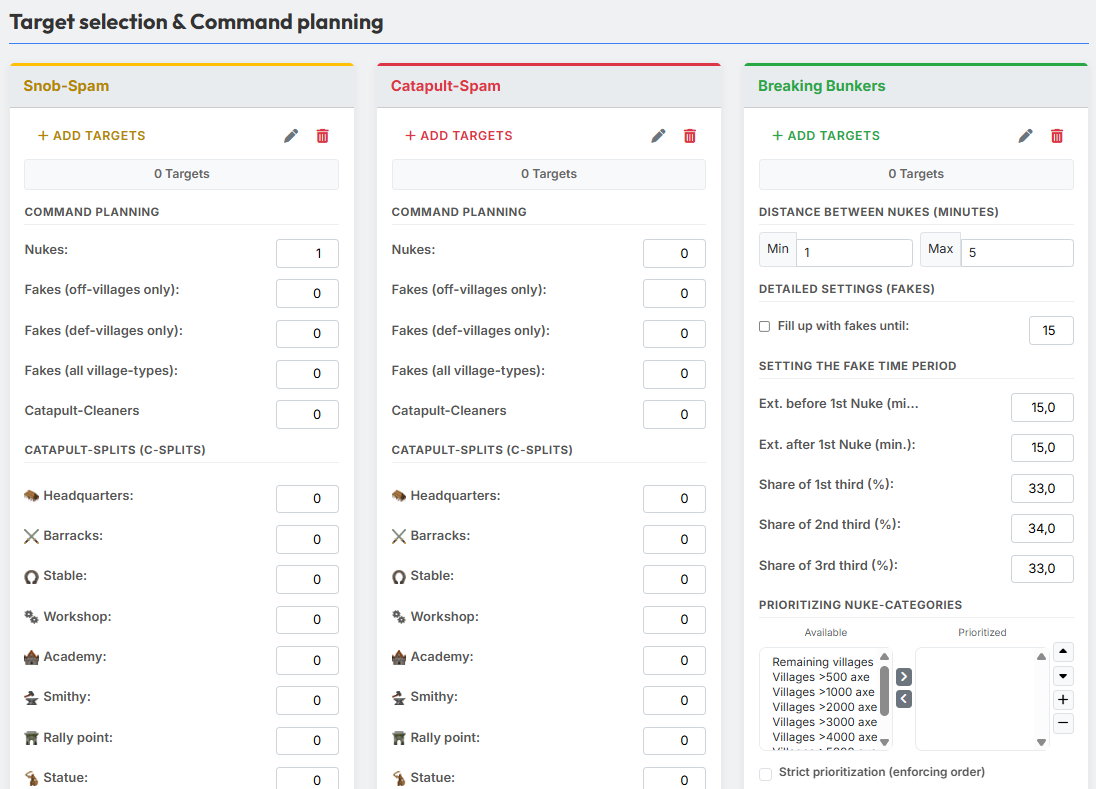
In the "Target selection & Command planning" section the three categories are shown side by side as columns (Snob-Spam, Catapult-Spam, Breaking Bunkers). The same controls are available in each column:
- "+ Add targets" — opens the modal for adding new targets.
- Pencil icon — opens the modal for editing the existing target list.
- Trash icon — deletes all targets of this category at once.
- "X Targets" counter — shows the current number of targets in the category.
Below that, the category-specific command and detail settings follow, which are described in the next sections.
5. Adding targets
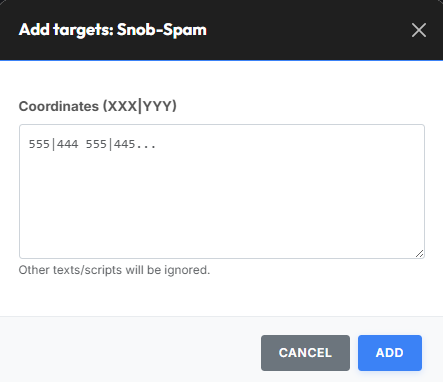
Clicking the "+ Add targets" button opens the "Add targets:
XXX|YYY into the text field — any surrounding text or
script output is fine, the tool extracts the coordinates automatically.
Confirm with "Add".
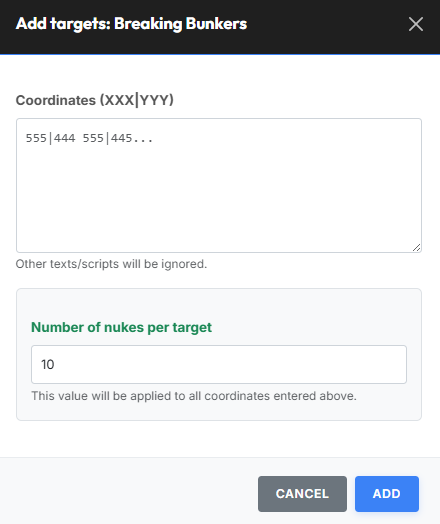
For the Breaking Bunkers category there is an additional "Number of nukes per target" field. The value entered here is applied to all coordinates entered in the text field. This way you can conveniently set up a whole list of bunkers with a uniform number of nukes per target in one go.
No duplicates
The tool ensures that no real attack targets can be duplicated across all three categories. Coordinates that already exist in another category are automatically filtered out when adding new ones.
6. Editing targets
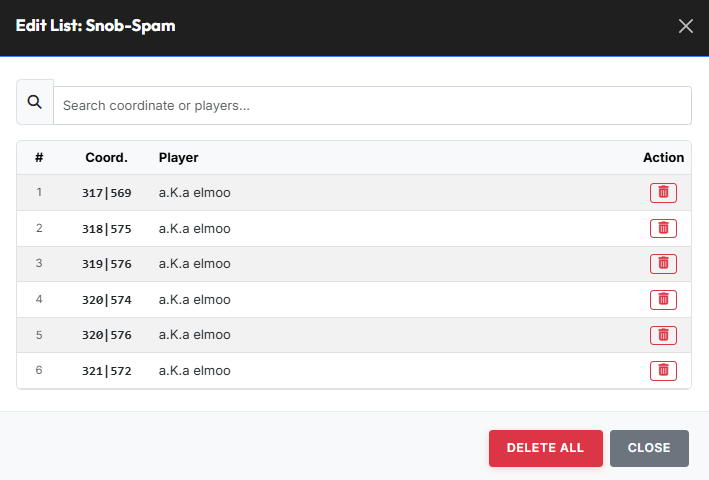
The pencil icon opens the "Edit List:
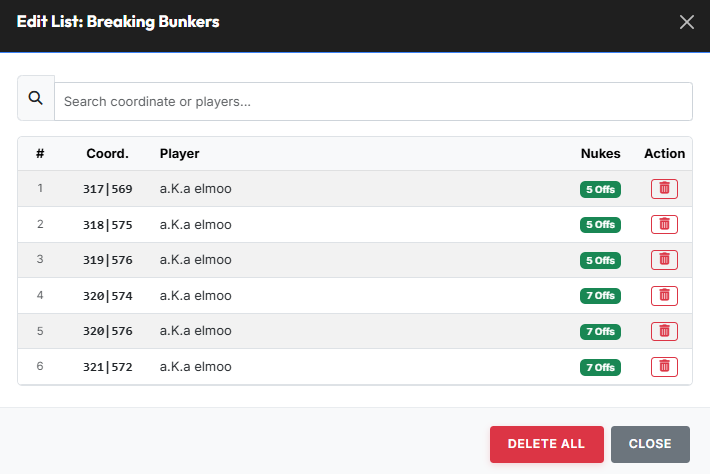
For the Breaking Bunkers category, the configured number of nukes per target is additionally displayed.
7. Command planning per category
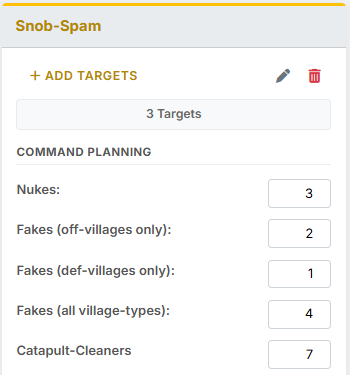
In the "Command Planning" area you define per category how many commands per target should be planned.
Snob-Spam and Catapult-Spam identical — Breaking Bunkers reduced
Command planning is structured identically for the Snob-Spam and Catapult-Spam categories. The Breaking Bunkers category offers a slightly reduced set of options — the number of nukes per target is already defined when adding the targets and is therefore omitted here.
The following fields are available per target:
- Nukes — number of real nuke attacks per target.
- Fakes (off-villages only) — accompanying fakes launched exclusively from offensive villages.
- Fakes (def-villages only) — accompanying fakes launched exclusively from defensive villages.
- Fakes (all village-types) — accompanying fakes launched from any village type.
- Catapult-Cleaners — number of interim cleaners per target (see Global Settings for the troop composition).
Accompanying fakes ≠ Tab 3
The fakes defined here are accompanying fakes for the real targets of this category. Planning of pure fake targets is done separately in Tab 3: Fake-Planning.
8. Catapult-Splits (C-Splits)
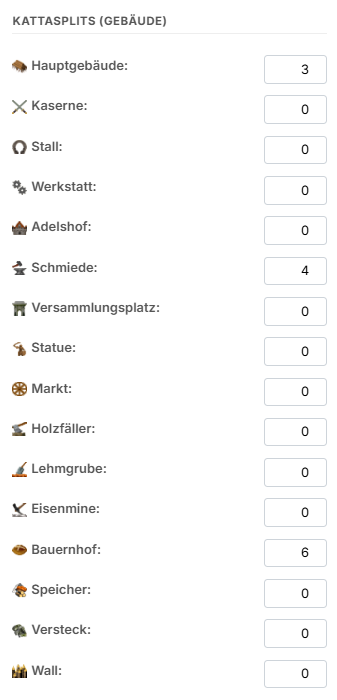
In the "Catapult-Splits (Buildings)" area you define, per building, how many catapult-splits the tool should plan against it. The number you enter is the number of individual splits the tool will try to plan against that building.
For example, entering 3 for the Headquarters tells the tool to
plan three catapult-splits against the headquarters — and each of
these splits uses the standard unit count defined under
Global Settings → Standard C-split.
Which buildings are available depends on the world.
9. Setting the fake time period
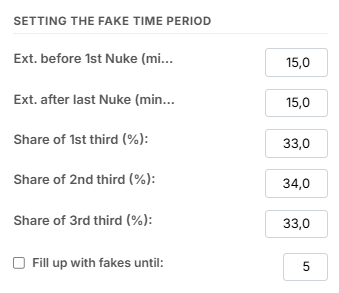
In the "Setting the fake time period" area you define the time window and the distribution of accompanying fakes around the 1st nuke:
- Ext. before 1st Nuke (min.) — how many minutes before the 1st nuke the fake period may start.
- Ext. after 1st Nuke (min.) — how many minutes after the 1st nuke the fake period may end.
- Share of 1st/2nd/3rd third (%) — the entire fake time window is internally divided into three equal-sized time thirds. Here you define what percentage of the fakes falls into each third. This is essentially how you control where in the overall command sequence the accompanying fakes mainly appear — i.e. whether they arrive before the real nukes, mixed in with them, or after them. An even distribution (e.g. 33/34/33) spreads the fakes across the whole window; an uneven distribution (e.g. 50/30/20) concentrates them for example before the 1st nuke. The three values should add up to 100 %.
- Fill up with fakes until — the number of commands per target you want each target to always carry in this category. Useful when you want every target to end up with the same number of incs. If a command (nuke, catapult-cleaner or C-split) cannot be planned for a target, the missing commands are filled up with fakes when this option is enabled — so each target in this category still ends up with the same total number of commands.
10. Distances between nukes and C-Splits
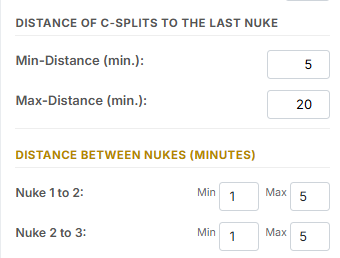
In the "Distance of C-Splits to last Nuke" area you define how far the catapult-splits should arrive in time after the last nuke (Min-Distance / Max-Distance in minutes).
In the "Distance between Nukes (minutes)" area you control how close or far apart consecutive nukes on a target should arrive in time. For each pair of consecutive nukes you enter a min and max value in minutes:
- Nuke 1 → 2 — the distance of the 2nd nuke to the 1st nuke.
- Nuke 2 → 3 — the distance of the 3rd nuke to the 2nd nuke.
- and so on — same scheme for all further nukes.
Example — Accounting for late sending: More generous nuke spacing is especially useful when you want to factor late sending of the incs into the planning itself. Imagine a catapult action: per target you plan 2 nukes and 5 C-Splits, and the distance of the C-Splits to the last nuke is set to 3 minutes. If the distance between the 1st and 2nd nuke is very small, a late send can cause the nukes to actually arrive behind the C-Splits. If you instead set Nuke 1 → 2 to e.g. 10 minutes, the 1st nuke would still arrive safely before the C-Splits even if both nukes were sent 5 minutes late.
11. Prioritizing Nuke-Categories
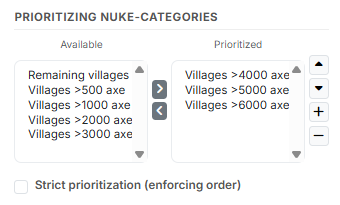
In the "Prioritizing Nuke-Categories" area you define which source categories should preferably be used for planning nukes. Available categories include Villages >500 axe, >1000 axe, >2000 axe, …, >6000 axe. Move the desired categories into the right list "Prioritized" via the arrow buttons and sort them by priority.
The checkbox "Strict prioritization (enforcing order)" controls how the prioritization is interpreted:
- Off — The selected source categories are merged into a single shared pool from which nukes are planned. The order in the prioritized list then has no effect on the planning.
- On — Priority is strictly enforced: a lower-priority category is only used once no valid options can be found in the higher-priority category.
12. Summary & Map
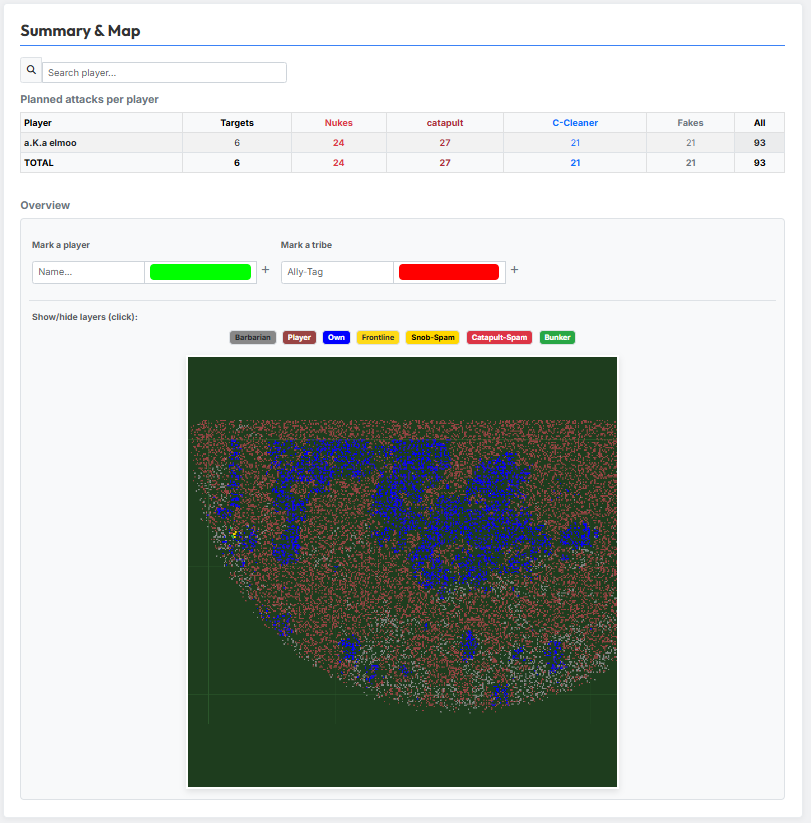
In the "Summary & Map" area you see an overview of all planned attacks after the planning is done.
The "Planned attacks per player" table shows, per player, the number of Targets, Nukes, Catapult, C-Cleaner, Fakes and All — plus a TOTAL summary row. Use the search in the table header to filter for individual players.
In the Overview area you can additionally mark a player (green) or an entire tribe (red) to highlight them on the map.
On the map, various layers can be toggled (click on the button bar): Backline, Player, Off, Frontline, Snob-Spam, Catapult-Spam and Bunker. This lets you visually verify the distribution of the planned attacks before moving on to Tab 3 or Tab 4.